There is a spot in each and every house, through which wast amounts of heat is being lost each winter. That is – with exception of very well designed modern houses. However, wast mayority of buildings simply fail at it. I would even say, that it is over 99% of newly built houses! So what about your own new house or house extension? Will you get this matter right?
Most important detail in house design
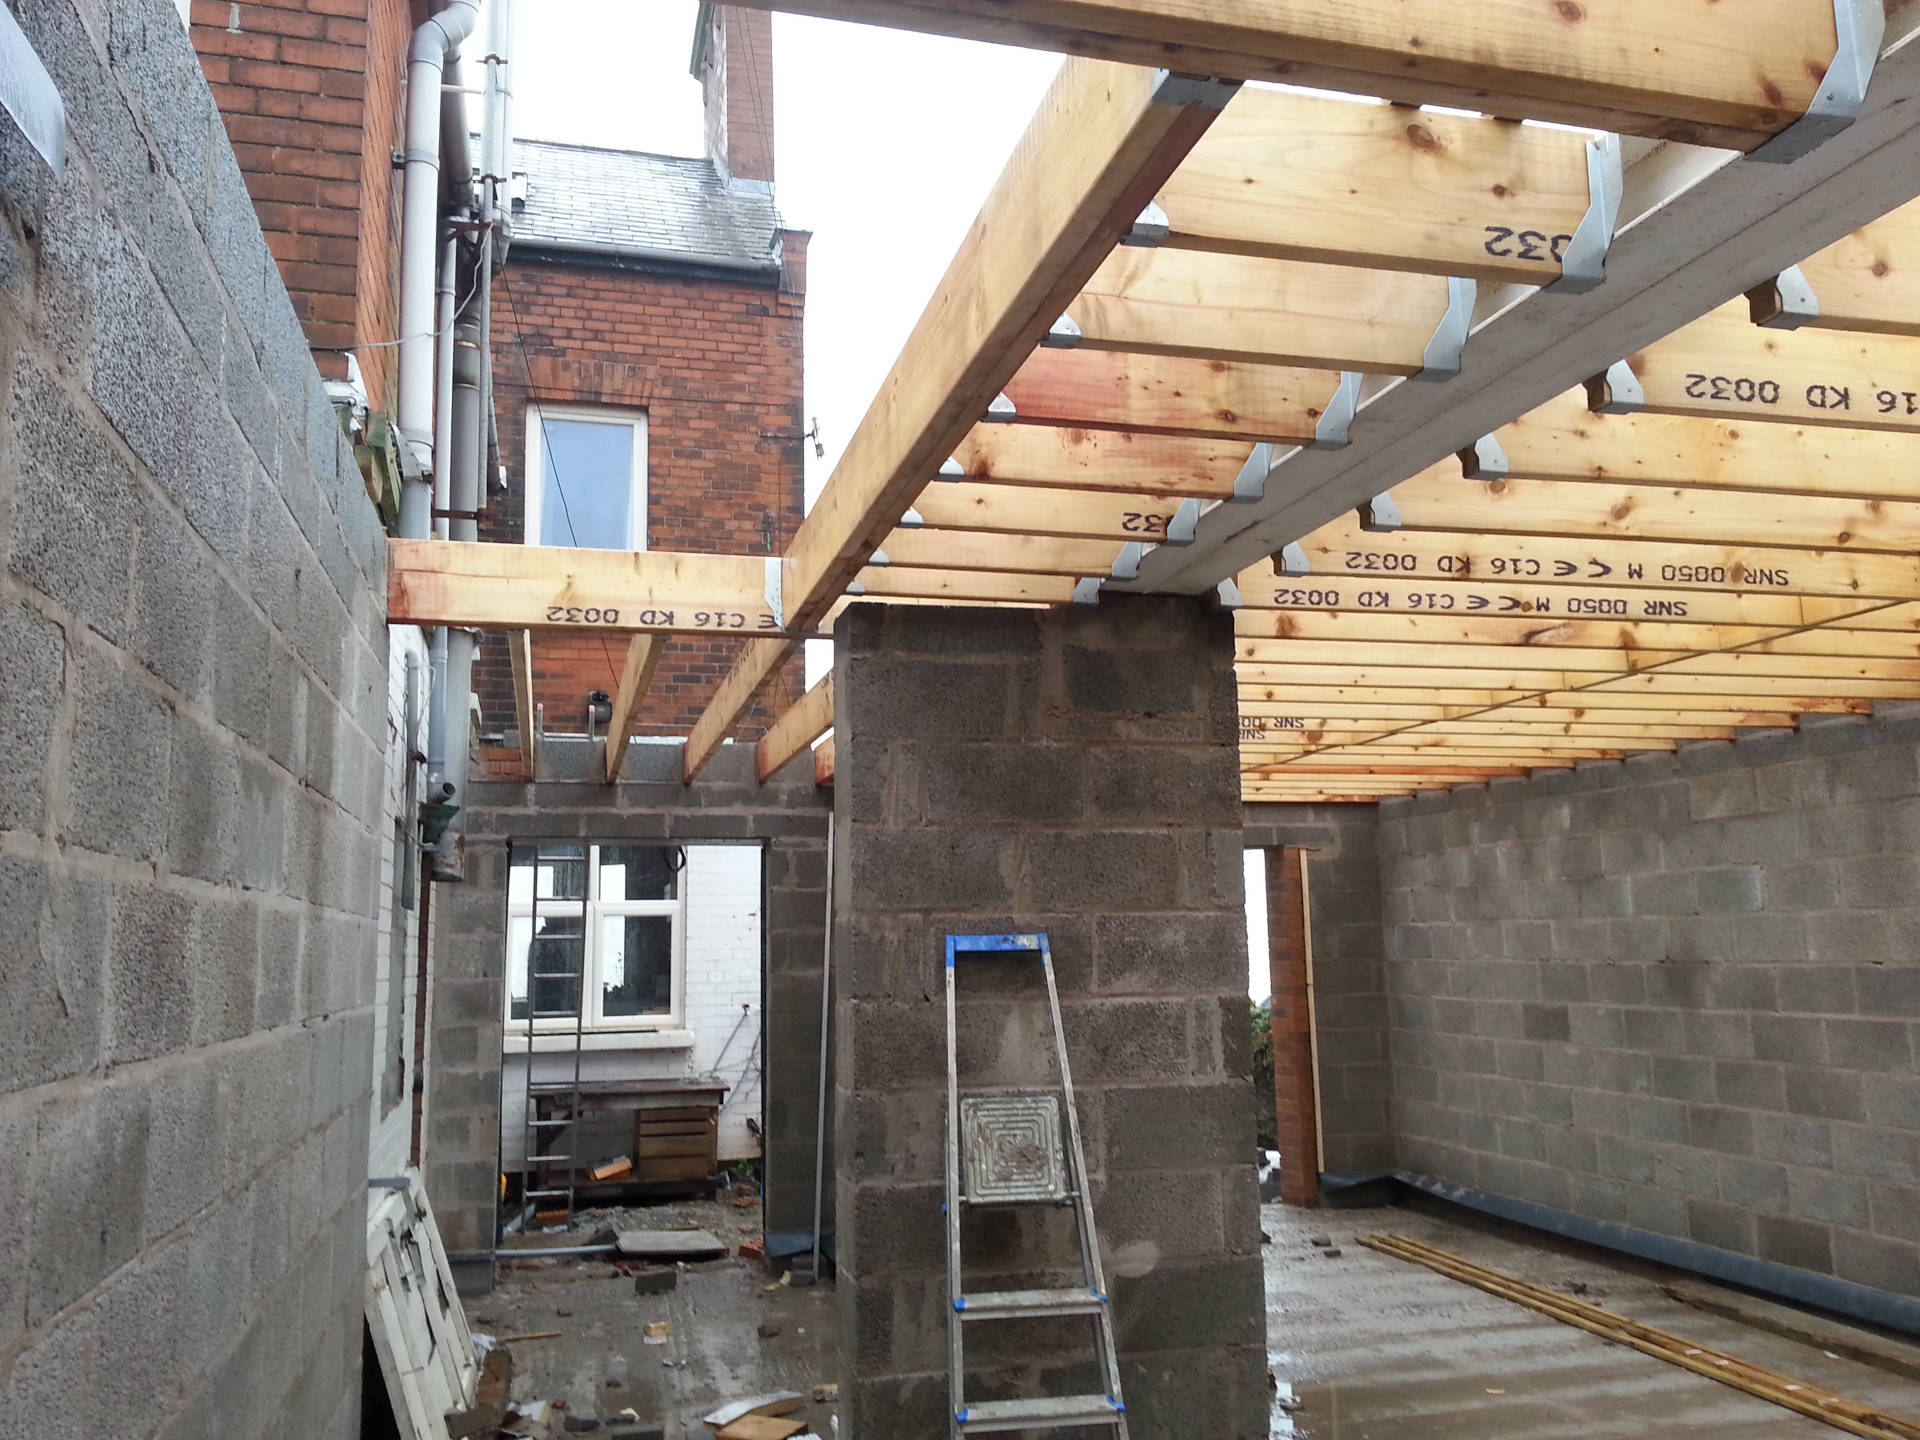
From technical design point of view there are many things to consider and get right. There are many details to sort out to get house design right, even before builder will learn that there is a new project to engage on. Sure foundations need to be strong and stable, so looking from a structural point of view it is foundations that are most important element of design. There are multiple other elements to care for and each of those elements seem most important, when you look on design from different point of view (like structural point of view, natural lighting point of view, ventilation, fire escape, access and so on). There is this point of view of energy preservation, and more specifically: aiming to keep house warm in winter. Looking from this point of view and aiming to conserve heat you need to get one detail right. That is right – just one detail! Where is it located in a building? It is where structural walls meet lowest level floor (typically ground floor level). If not done right, it will cause you to use a lot of oil, gas, electricity (or whatever you use to heat your house). Over years and decades it will be quite a fortune spent on heating bills. And energy is costs and prices of energy are rising. I noticed multiple rises of price of electricity in 2021. That is at least my own electricity supplier. Building the junction between all walls and ground floor right will give your house a head start. You will mitigate a thermal bridge and give your house a head start for decades to come. But what is a thermal bridge?
Thermal bridge
Thermal bridge is a point (but mostly it is line) at which energy is transferred from inside of house to outside at an increased rate (in summer we are concerned with it being the other way around as we try to shield our houses from heat). There are many different thermal bridges that houses can have. A balcony is placed on external wall and cools it down in winter and warms it in summer. Chimneys are sticking out of building doing same from the top. Other examples would be: sills, overhanging bay window, projecting window frames, columns, deep eaves, corner windows, roof terraces. Thermal bridge is a relatively new concept. For thermal bridge to exist wall (roof or floor) needs to be, generally speaking, insulated. Buildings build today need to meet requirements of Building Regulations, which call for walls, roofs and floors to be insulated. The better the insulation levels, the more pronounced the thermal bridge is. Hence thermal bridge is especially serious thing in super insulated buildings, that are increasingly popular.
Does it apply to all types of buildings?
It does apply to houses and other types of buildings too. It does apply to all technologies in which you may like to build. All wall types are not free from the thermal bridge at the base of the wall and are therefore losing energy to the ground below. You may build using:
- timber-frame walls
- external insulation masonry wall
- hempcrete wall
- steel-frame wall
- cavity masonry wall
- straw-bale wall (even that one!)
Each of this walls (and other) will face challenge of wall-base to floor junction thermal-bridge and will be losing heat in that point. It will be heat loss at great rate, in contrast to middle of elements like: wall, floor, roof. While all walls need to lose heat at that point, as they simply need to touch the ground, it can be mitigated. There are solutions to the problem!
How bad it can be?
Before looking into solution to the problem, perhaps it would be good to see if you can simply ignore it in the first place. Why should you bother? Should you worry about losing some heat (extra) in winter? If you have heating system and money to pay for oil / gas / electricity to heat your house, then why bother? And you guess it right – getting this detail solved does cost some upfront investment! First of all it is about money – your money. Investing upfront you save little each year and soon you simply are financially better of, so it is simply an investment. Just like investing in shares of a company, that you may not know much about, you spend upfront and see how it pans out. In this case it is your own business you invest in and the rise of ‘price of shares’ (so to say) is predictable. Secondly, if you don’t do it right, it will not happen. You better take onboard, that it is not something to do as a retrofit project (upgrade project). You won’t lift house to put insulation under all walls – or you will surprise me! Third thing, that can get bad and really bad is condensation and mould growth resulting from it. Having well insulated walls and floors and roof(s), all thermal bridges are very likely to to attract moisture from the air and let it condense there, creating perfect conditions for mould to grow! To recap:
- losing money (long term)
- having no option to do it later
- condensation issue and resulting mould infection in house
- atmospheric warming with carbon/energy/extinction treats to planet
What are the solutions?
There are two ways to deal with the problem. Both of them valid and effective. First is more effective and better suited to light buildings, that houses should be in the first place. Second is a more universally applicable and easier to apply to popular ways of building houses today. There is third, that simply insulates house on the inside of external walls, but is much more effective and brings downsides. For new houses and house extensions, I recommend the first two methods:
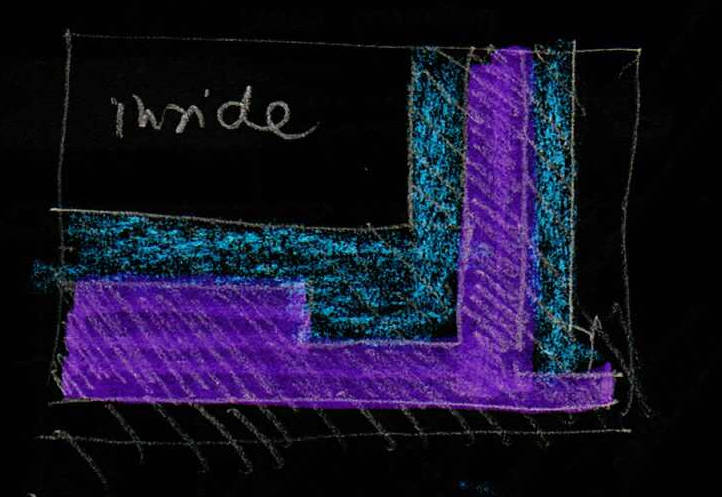
- walls on top of insulated raft
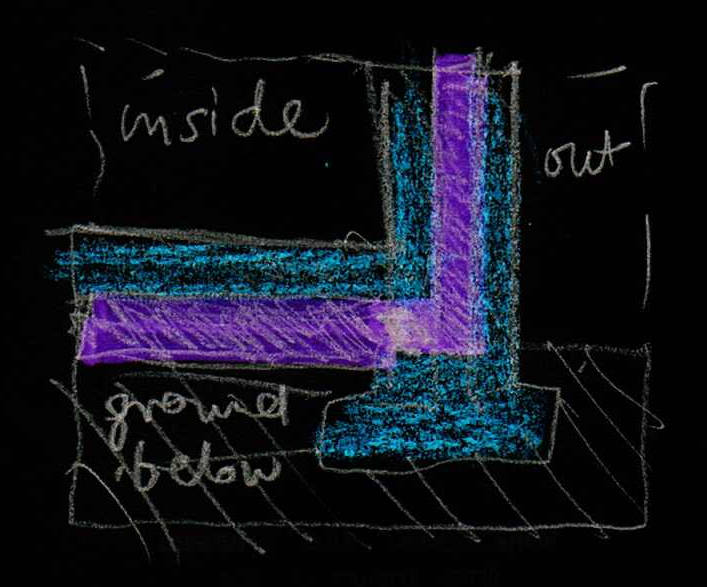
- thermal break under solid walls
- insulating external wall on inside
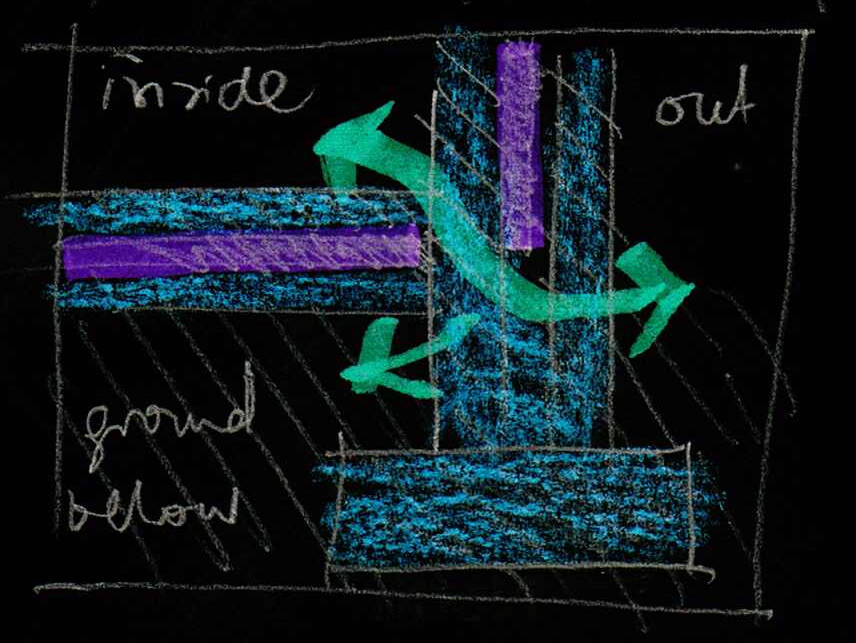
The first method of building all walls on top of a raft foundation is for light buildings, as raft in this case sits on top of layer of insulation. It has further limitation, that it is not suitable where you need special foundations, like piling. In second method you insert special thermal break (for example layer of thermal blocks) at the base of wall, just opposite layer of insulation in your floor. Third method of dealing with the issue does not deal with the issue at all – it simply acknowledges that wall is cold and tries to defend heat on the inside plane of external walls. The third method is the only one suitable for retrofit projects (refurbishments), but has a lot of downsides! Obviously – you can not put raft foundations under house you already built, and putting thermal blocks under all your walls or built house is rather out of cards too!
Designing thermal break
To state the obvious – you need to start and complete technical design before you build. You can’t expect builder to read your mind and provide for thermal break in quote you receive and building you find on site, when builders finished their job.
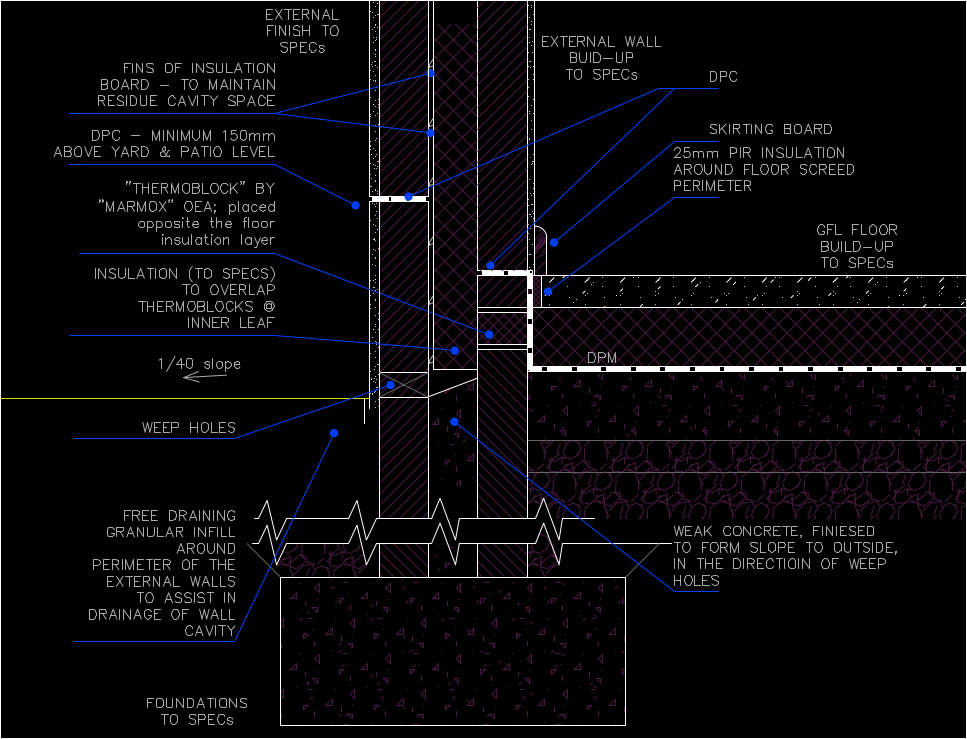
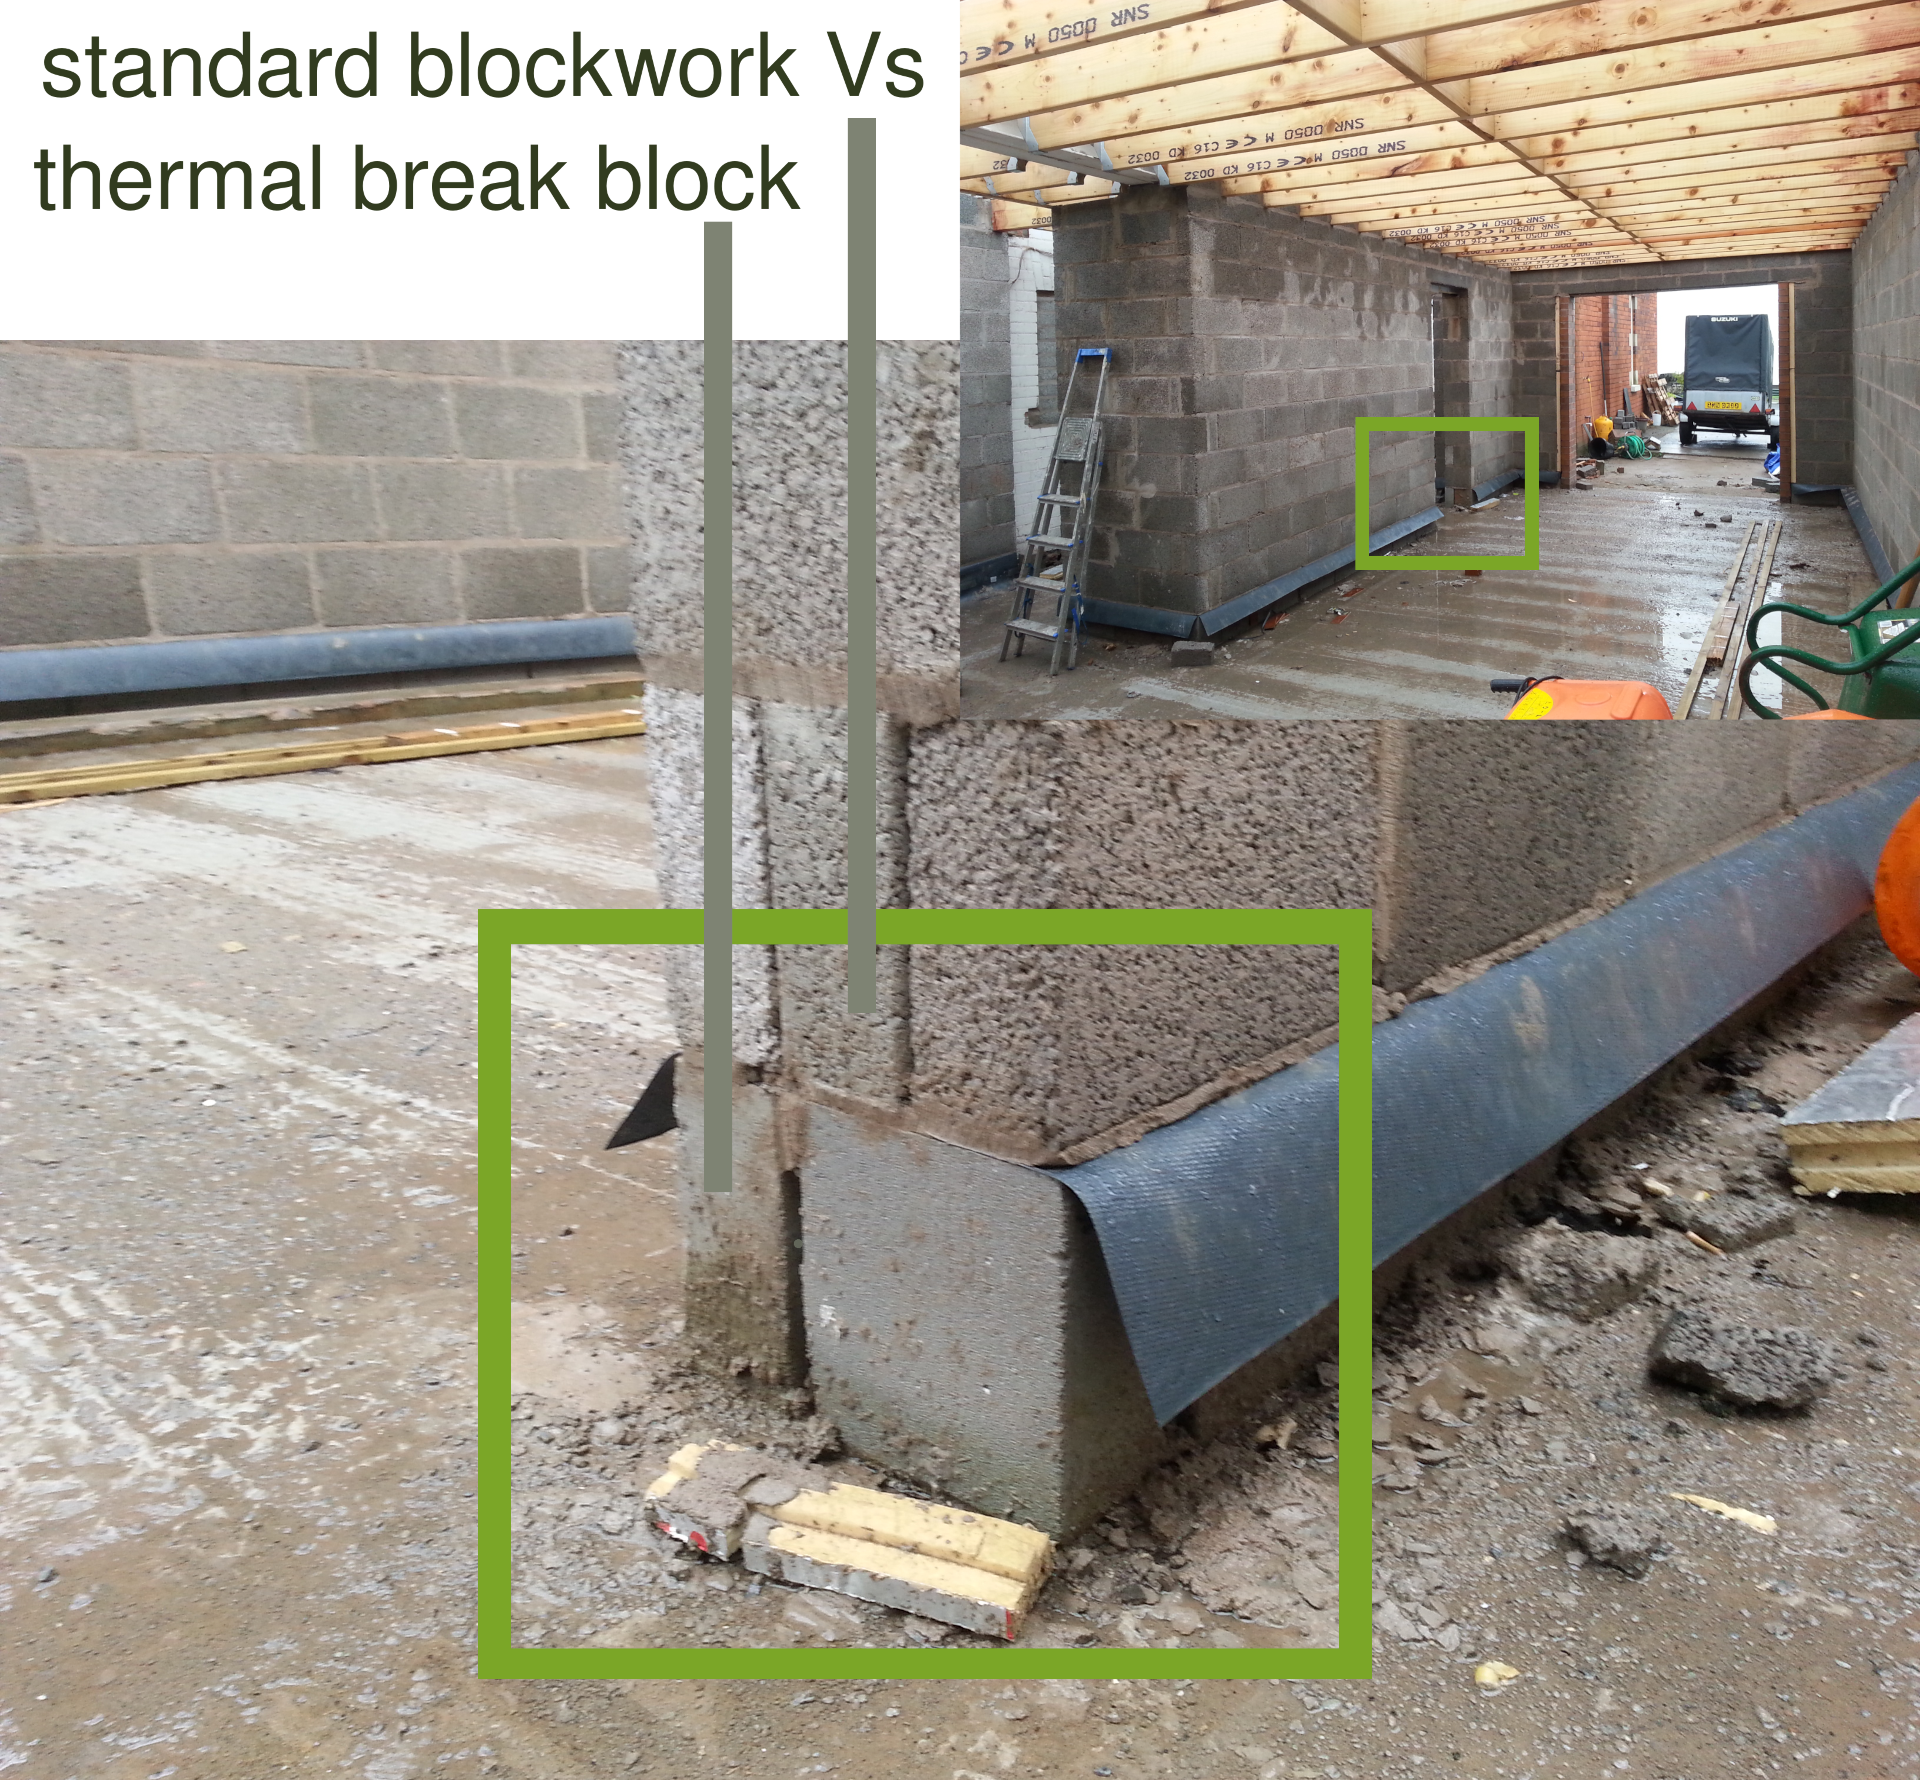
Let’s assume that you use cavity wall construction. It is an outdated technique of building, but unfortunately still very common. For walls that pass the lowest level floor (internal and external), you need to substitute layer of blocks that are in plane with floor insulation by special type of ‘block’. There is some choice in what you can use, but you need to be careful as those products have various requirements.
- thermoblock by marmox
- Quinn Lite thermal blocks by Quinn
- Foamglass Perinsul HL by Pittsburgh Corning UK Ltd
Before incorporating any of the above, or any other, products consult your building design professional about suitability and specifications for design of your house.
Getting it built to your design and specifications
From my experience, even as thermal breaks are provided in the design, it is rarely done on site. It is designed in, but not executed in real life. Builders have their business to mind and their bottom line to care for. This detail may be seen as opportunity to save some money, downgrading it may be calculate from first estimated costs, from quote or simply as problems with budgets unfold during the construction. Even if thermal break involves simply substituting single row of blockwork with special thermal blocks, downgrading it to standard block is opportunity to ‘save’ some money. It may be a benign attempt to rescue project budget on part of the builder. If you agree to downgrade solution specified in the design, know that you will pay back your ‘savings’ with interest over the years & decades. Those who will inherit your house may pay if for hundred of years, as buildings should and have capacity to last for that long. So, first of all,
- know what you have on your design, drawings and specifications
- know what to look for on your construction site
- know what to keep your builder accountable for
- have an idea about the cost and specifications involved, in case of substitute products

If you don’t notice or don’t check what is being done on site as work progresses, elements like this thermal break will be covered by subsequent works (in this case floor). The bad news is, that even having designed the thermal break, you should not count on inspecting Building Control officer. Inspector will be looking for basic stuff to get done right and will unlikely take notice of presence of thermal break. In case of this particular thermal bridge Inspectors are asking to extend insulation of external walls below lowest floor, which alleviate situation but does not remove the thermal bridge.
Wrap up
You need to get this element designed right way and then you need to ensure, that it is included in pricing by builder and at the end that it is executed to the design on site. You either get it done right or you don’t. The cheapest way is to get to understand it yourself and follow it through till completed on site. You may, however, decide to retain your designer to inspect your construction work or get another building professional to visit and check the progress. Getting someone beside Building Control Inspector may be worth investment in your project. Building Professional (architect, surveyor or engineer), that you pay directly is on your side in your relationship with your builder, while leaving design to your Builder and so abdicating any control over construction progress is sub-optimal. It leaves you at the mercy of the Builder. Remember, getting a Design & Build firm to do it all for you has same downside, just magnified.
If you are thinking about a building an extension to your house in Northern Ireland, you can contact Marcin on 075 4347 1402 or fill the contact form.
Disclaimer (link – relates to this article and the website as the whole).


Leave A Comment